DIY Barbie Doll House
So this project started out as “I’m not going to do much… just spray paint some plastic furniture. It’s not going to be fancy or the cutest dollhouse you’ve ever seen…” And ended with me spending two weeks obsessing adding board and batten to walls and making tiny baskets and chandeliers. It was a spiral into insanity but it was SO MUCH FUN! (Keep in mind I started this when we were first ordered to stay at home for the pandemic so it was very therapeutic as well. I highly recommend making one of these. It’s cheaper than therapy and keeps your mind occupied on something good instead of the crazy things happening right now.) Please note: when I was making this I never thought it would get the love and attention it got and so I didn’t photograph a lot of the steps. I did take videos for my instagram stories (thank goodness) so I was able to screenshot those to get some of the photos for this post. If you’re wondering why the photo quality on some of this is poor- that’s why. Sorry about that!
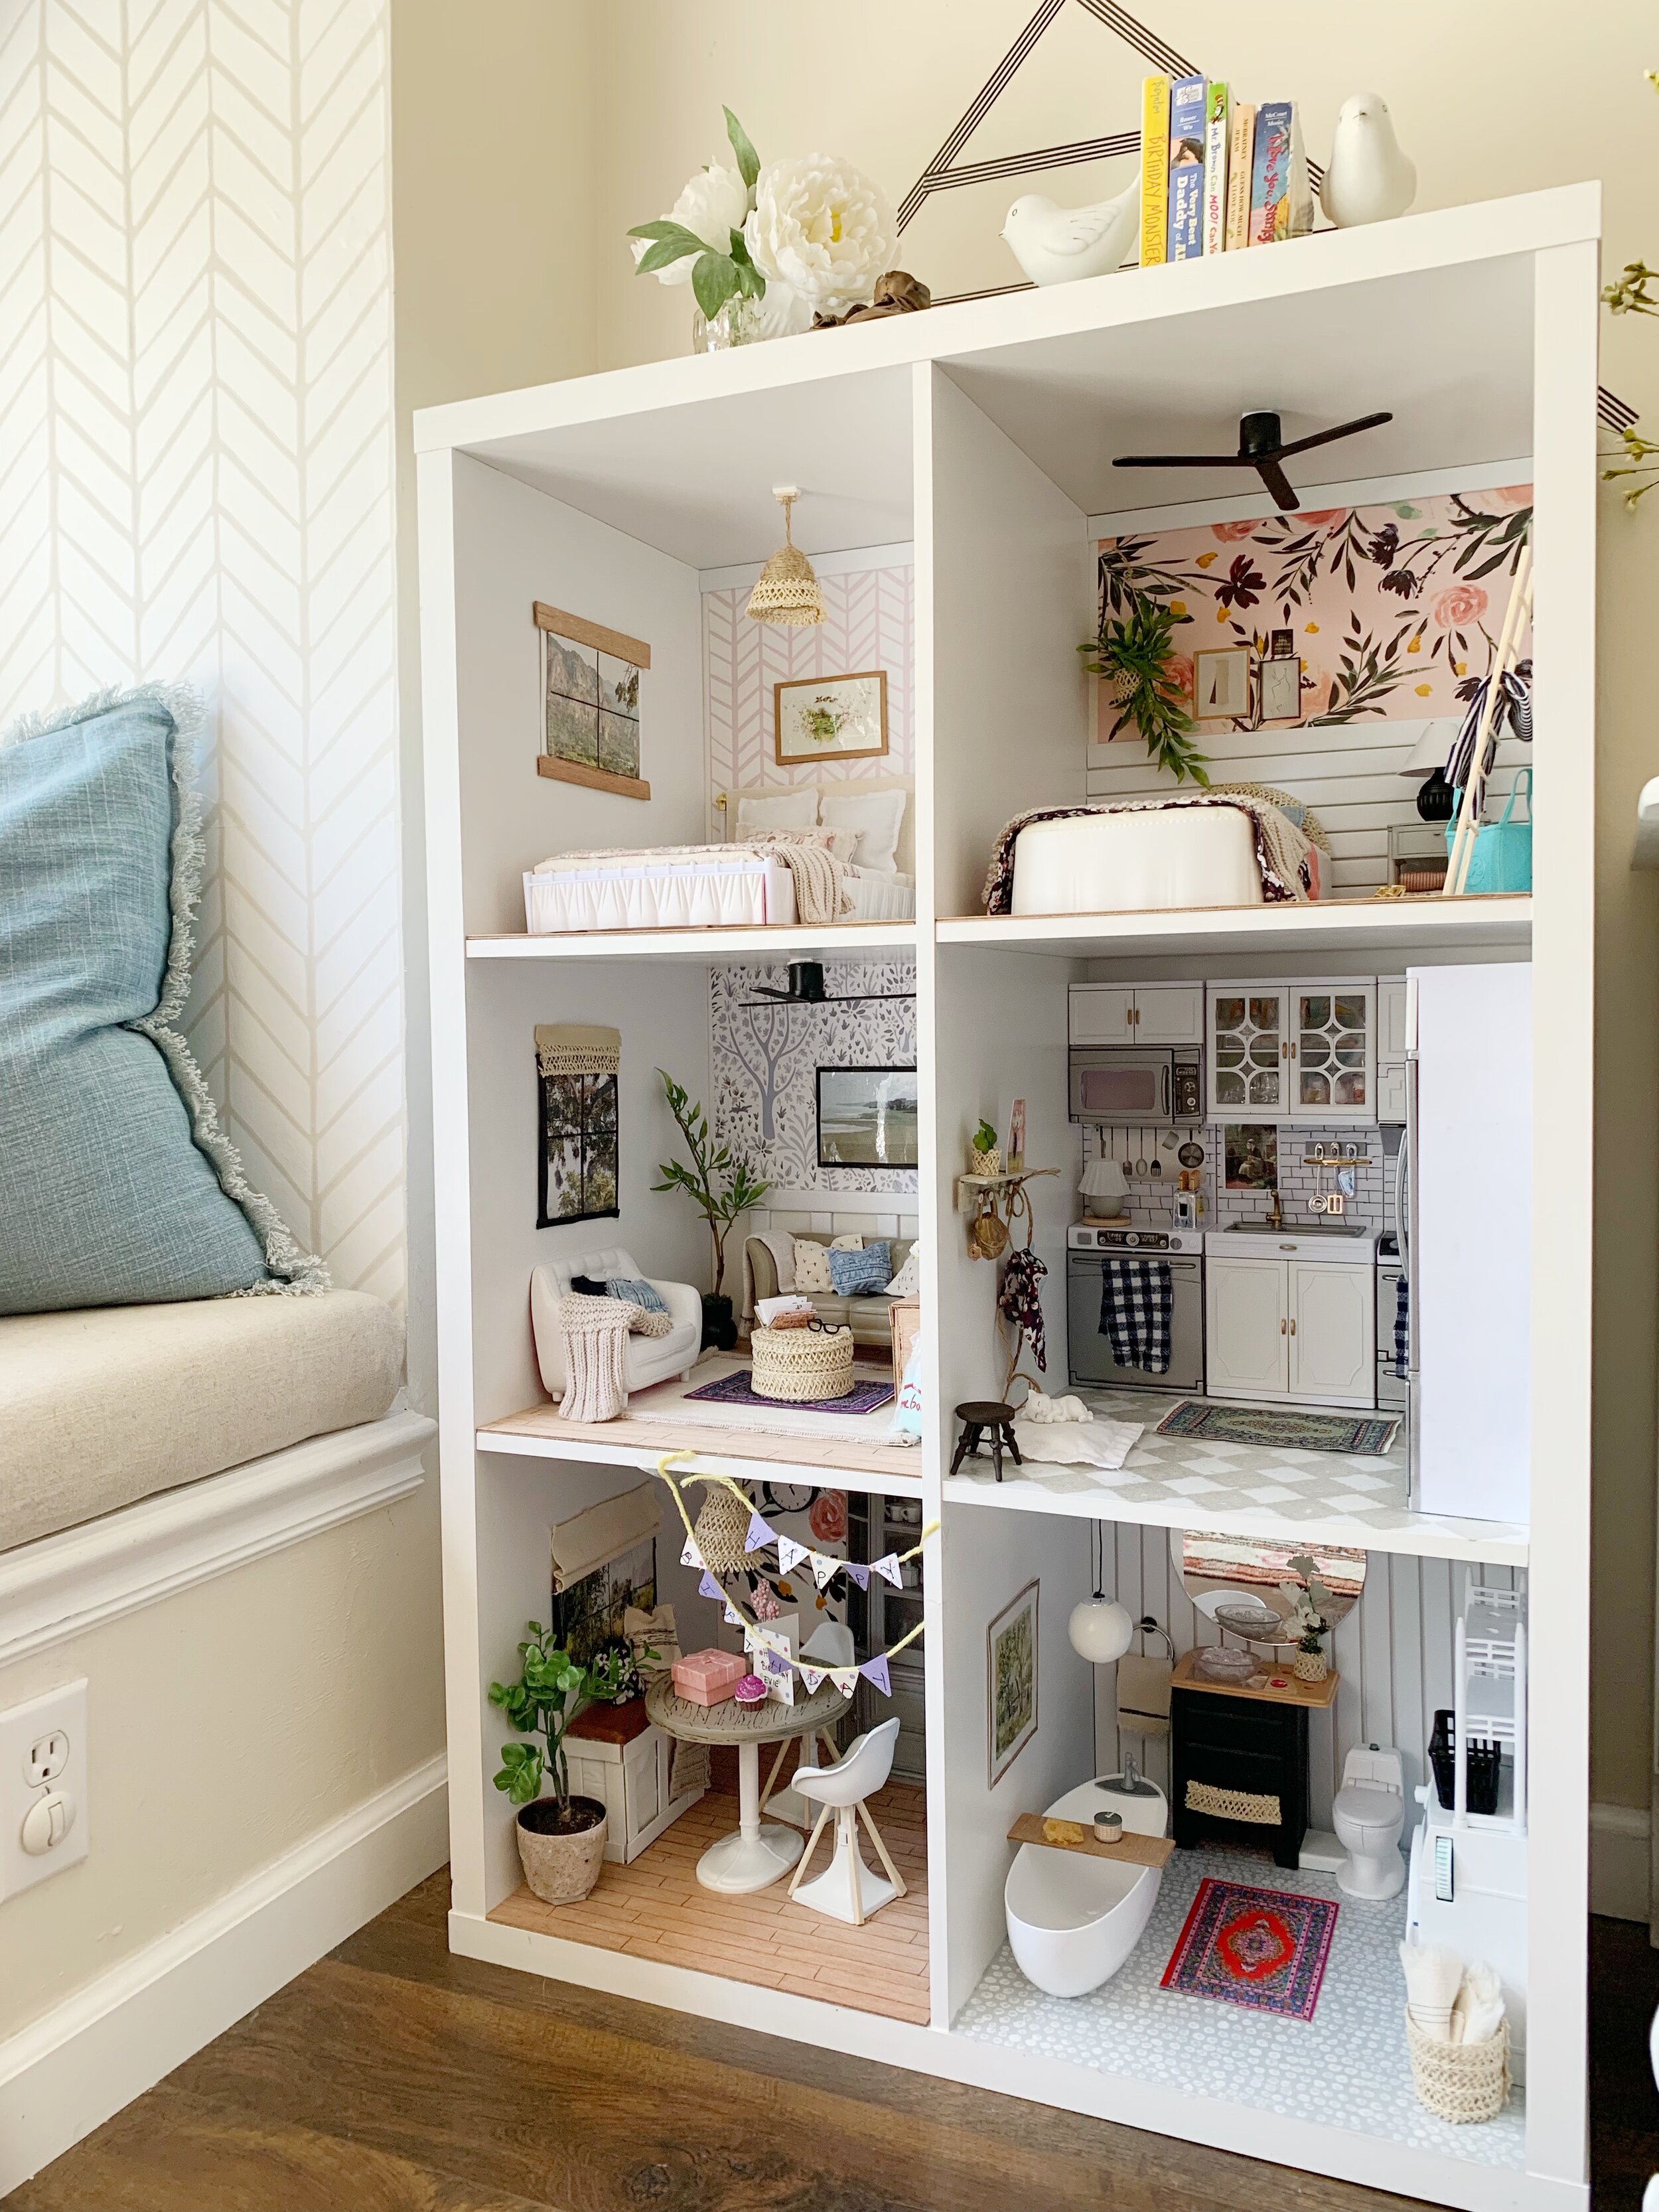
Here’s the completed dollhouse for your viewing pleasure! You can see an IGTV video tour on my instagram @hartley_home
When I made mine, I used a lot of things I had on hand because we couldn’t go into stores safely. But that also forced me to get really creative which was a lot of fun. We also had some furniture saved from the Barbie Dreamhouse we used to have (which the girls never played with). Any other furniture I bought and I’ll try to link as much of it as I can. Some of it is now 3x what I paid so I’ve find alternate products. I’m even going to provide multiple links and options in case they’re not available by the time you read this post. I’m serious about getting you this tiny furniture. This is not time to play. Haha! Get it? “Dollhouse Fever” has hit the world as it’s own tiny pandemic so hopefully these are in stock when you are ready to begin.
Materials:
*Is it weird that I’m kind of upset that some of this is cuter than the furniture I have and I’m already jealous that you can have it and I can’t? I wish I was totally joking… Haha!
Here are some materials you may have on hand that I used for mine:
old clothing to use as fabric
straw hat from dollar section
small makeup mirrors
wood scraps
wallpaper samples
clear contact paper
velcro strips
glue gun
Once you start this project EVERYTHING becomes a potential decor piece for this house. Scraps of wood… bits of a faux flower that falls on the floor… old plastic Easter eggs… chopsticks… its all like gold! Hah! You shall see what I mean once you start. Don’t let your family and friends judge you when you grab their trash out of their hands with a look of pure excitement in your eyes. That bottle cap is gonna make an adorable planter. I see your vision. Tell them your pal Kelly said its fiiiiiiiine. Haha!
Here we go….
So as I said, I started with the plan of just spray painting to make things more neutral and it quickly got out of hand. I love the Rustoleum 2x spray paint and I also used this matte enamel sealant so the paint wouldn’t chip. It’s been 2 months of playing and so far, so good.
I think this will be easier if I go room by room. Let’s start with the pink and beige bedroom. It started with this bedroom set:
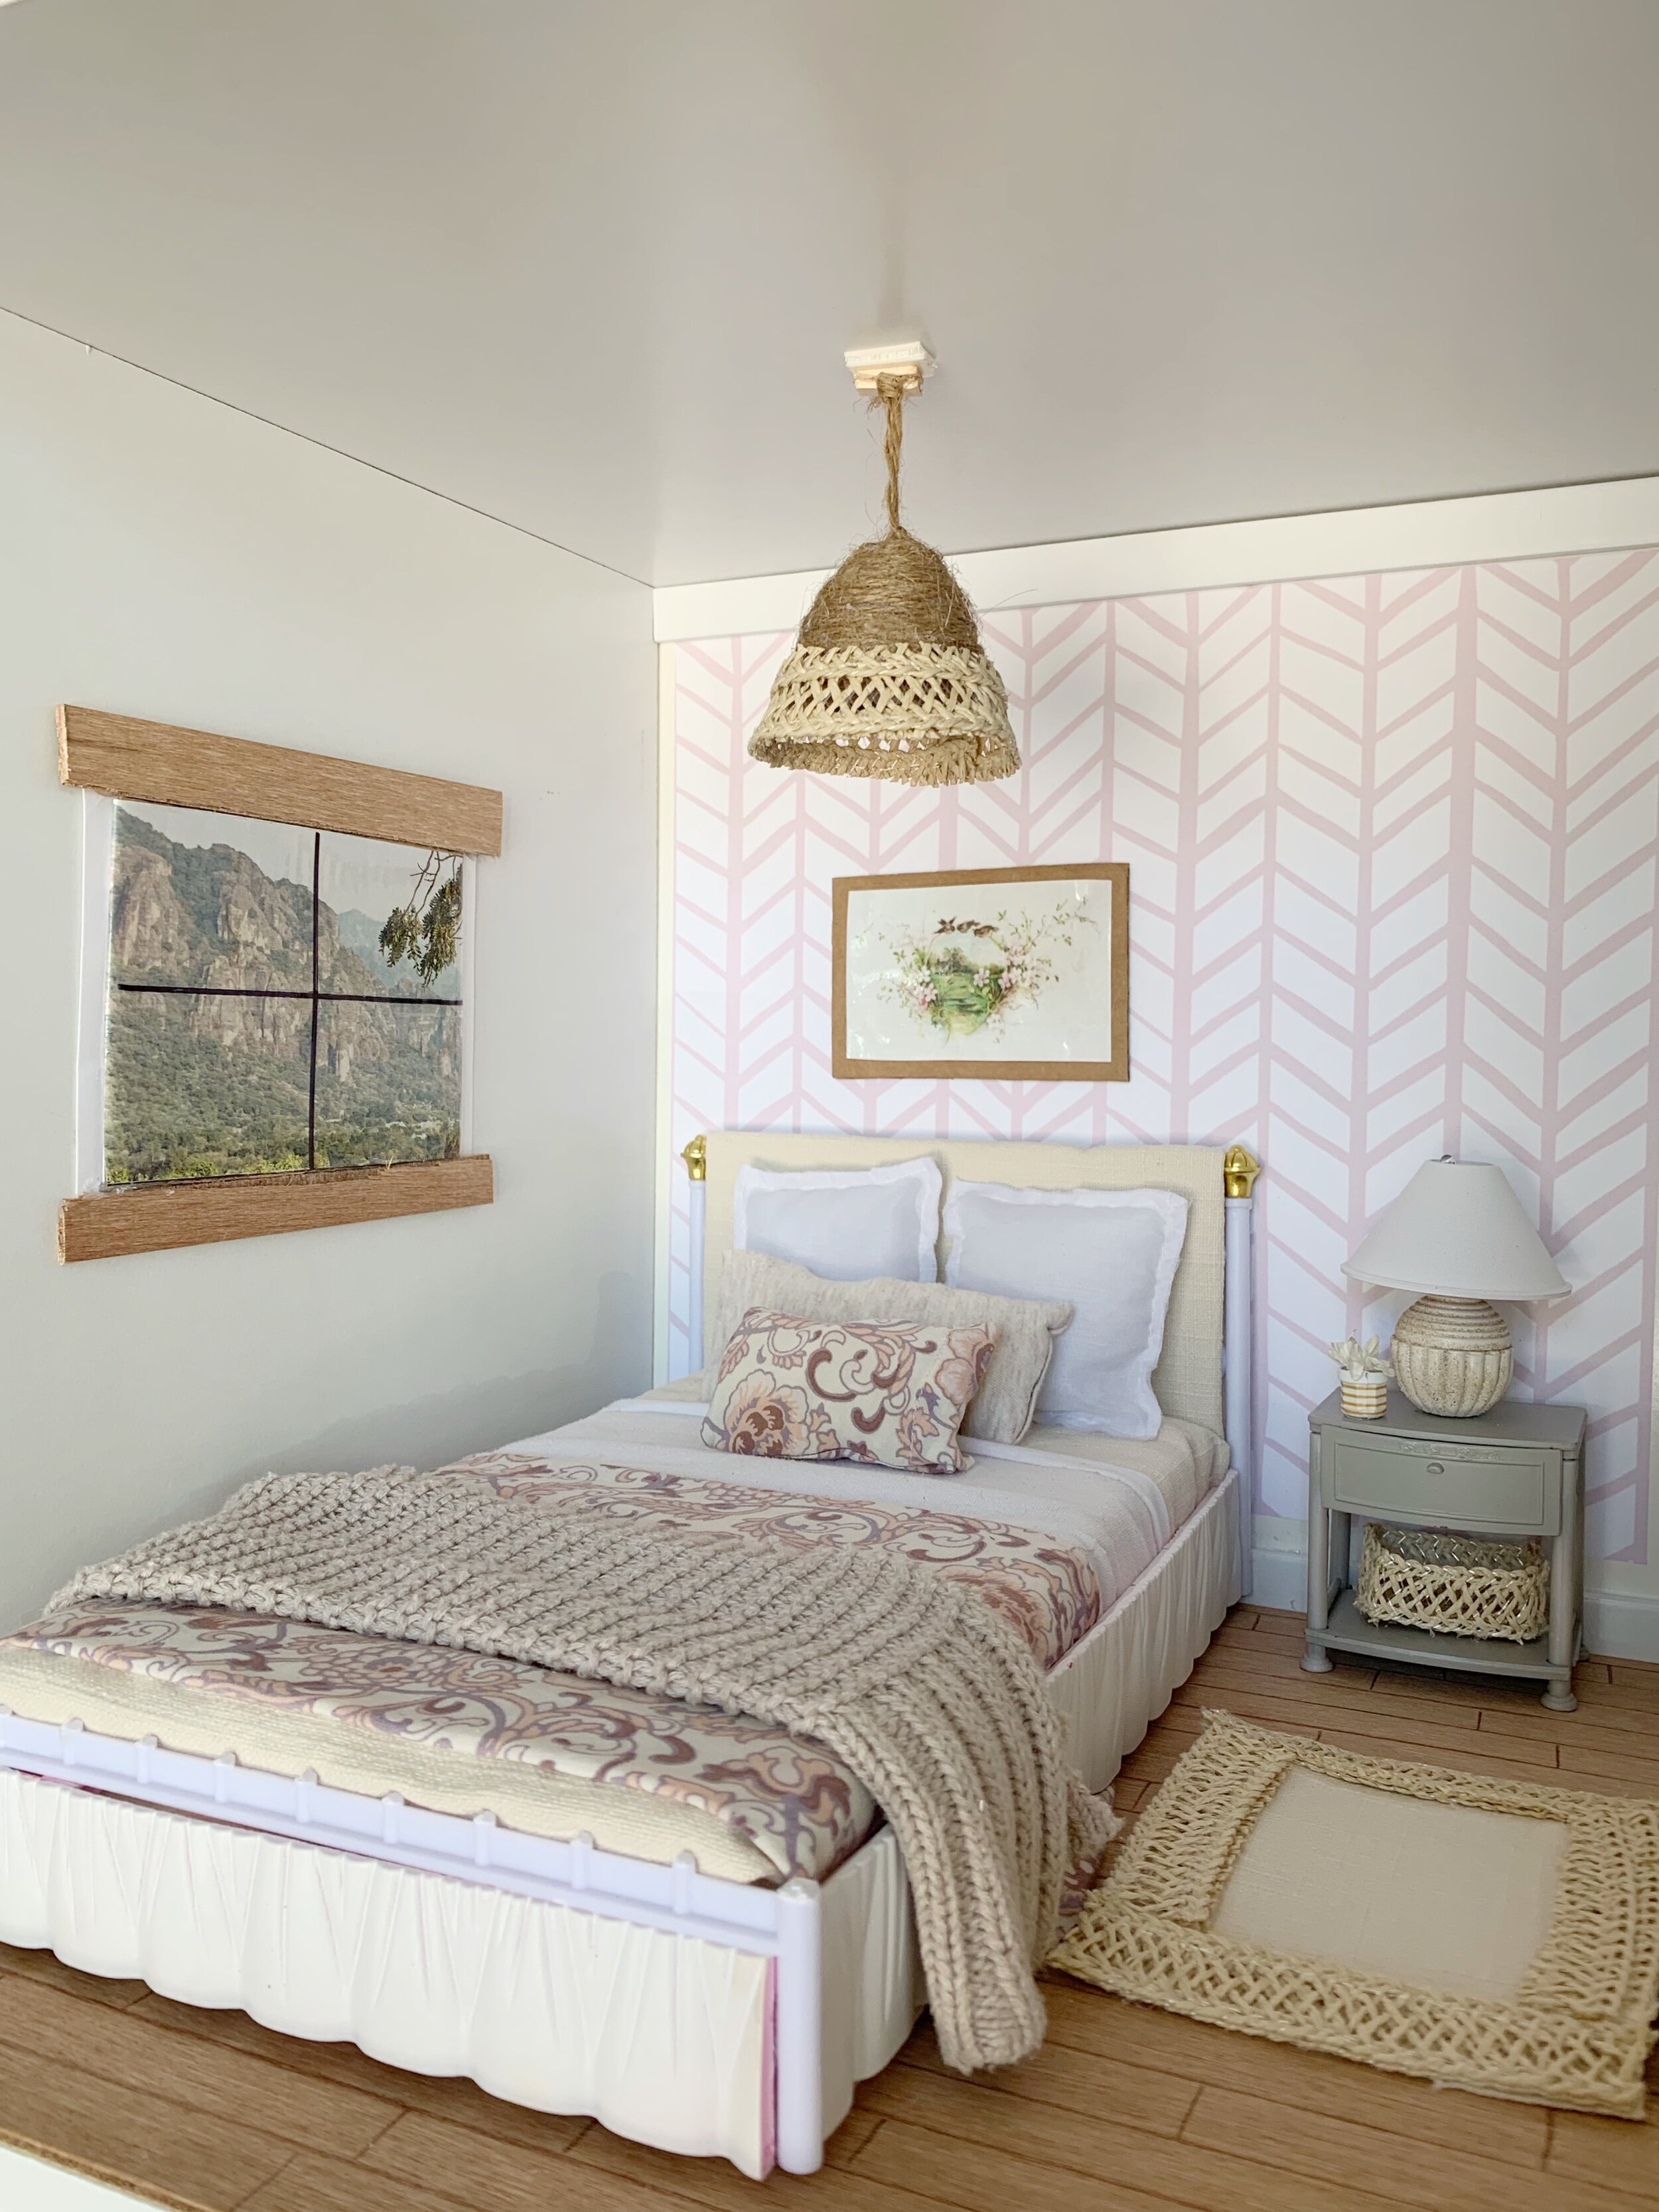
And ended up looking like this:
I started by spray painting the bed white, but then I still wasn’t thrilled with it.
So, like any normal person would do, I made it into an upholstered bed with some fabric, cardboard, and hot glue.
The bed comes with a cardboard mattress and that just won’t do for our fancy Barbs. I cut some foam I had on hand using a bread knife, wrapped it with fabric, and made a cozy mattress. (As I type this, I feel a little crazy… but one of my instagram followers told me to do it so who’s crazy now?! LOL)
For bedding, I used clothes from the girls’ that I was going to donate as the fabric. An old sweater became the throw blanket, an old dress is the quilt and a white tshirt became a sheet. Same for the pillows. And I didn’t sew any of it! I used hot glue to make my seams and it worked fine. For the window, I cut out a photo of a nature view from a magazine, covered it with packing tape to “laminate” it, drew window panes on with a permanent marker, and added some wood trim with hot glue. The wallpaper is peel and stick from Muse Wall Studio but you could also use scrapbook paper and that would work fine too.
For art, I simply printed out what I liked online and mounted it on cardboard to make it look framed. I painted the nightstand grey and made a tiny basket out of an old straw hat from Target’s dollar spot. The bedside rug is a piece of fabric trimmed with the hat pieces as well. That hat came in handy! It’s also the trim on the pendant light. To make that, I covered half a plastic Easter egg with twine, and Velcro’ed it to the ceiling for easy removal. For the floors, I used wood we had on hand, and drew the wood planks with a colored pencil.
I did end up cutting the footboard off the bed because it blocked the view of the pillows. It looked cuter that way anyway! That should do it for the pink bedroom!
Let’s move on to the Boho Bedroom! For this bedroom, I had a bed from the Dreamhouse I updated. I painted it off white and added a piece from the straw hat to make a cute woven headboard.
Then I made pillows and bedding from the girls’ donate pile clothes.
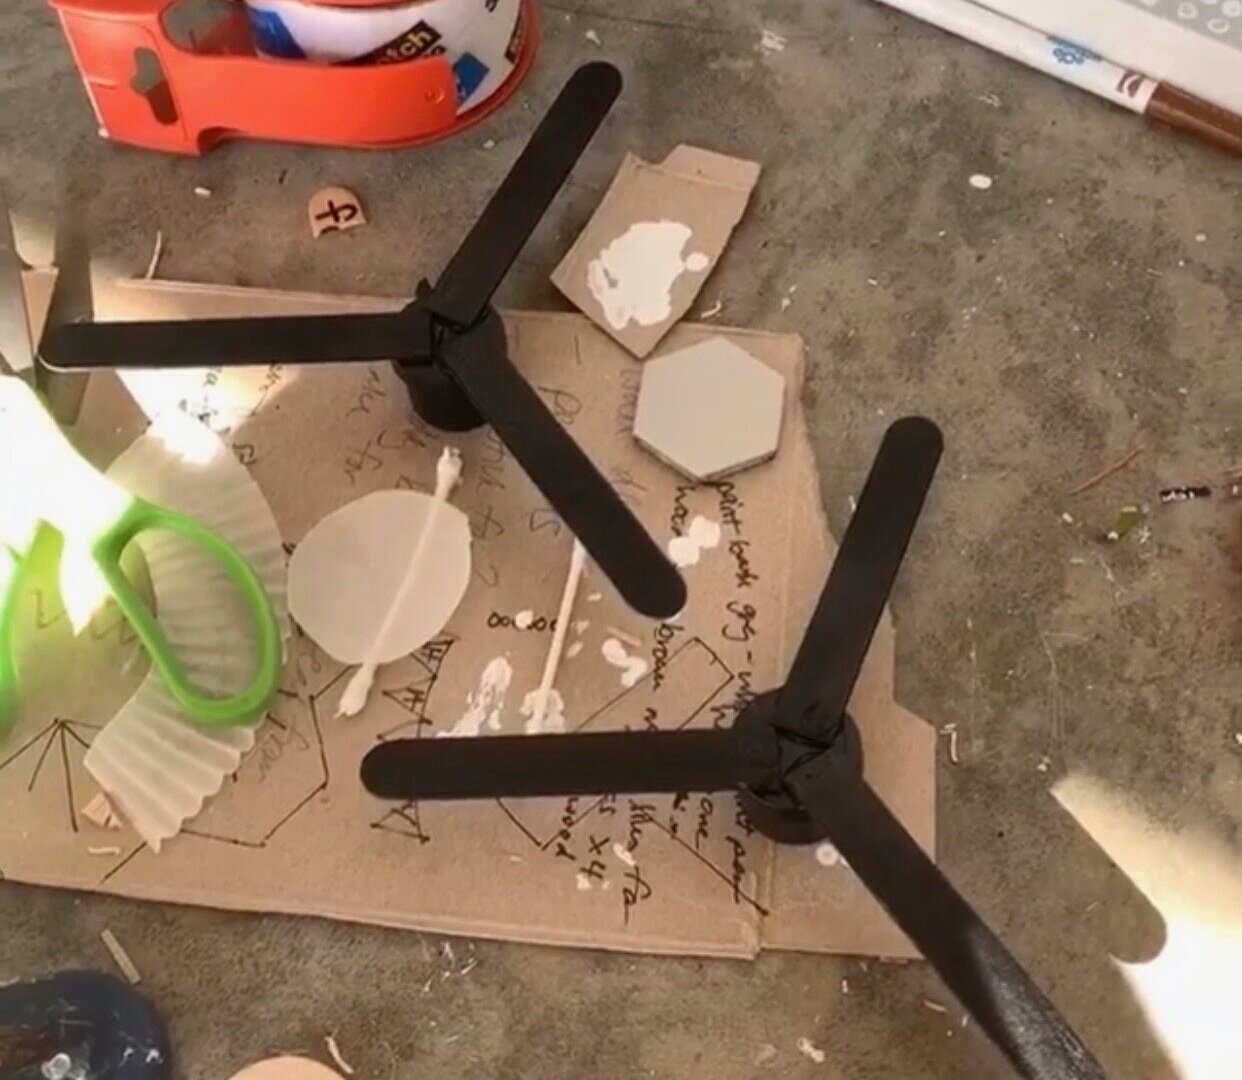
I painted some popsicle sticks and a tiny paint container black to make ceiling fans. I added some velcro to the top so the girls can take them down if they need more room to play.
No Boho space is complete without a hanging plant so I added one to the corner by using the straw hat material and some stray faux stems. I found the cute tiny rugs on Amazon and linked them above. Such a cute touch! Finally, I made a blanket ladder with chopsticks and toothpicks. Your hot glue gun will be your best friend for this project. I used it for everything! The wallpaper is from Muse Wall Studio and I made some shiplap on the bottom half of the wall with some left over plastic strips I had but you can use wood or Popsicle sticks.
Next up: the family room.
I bought the furniture and painted it all to make it more neutral. For the coffee table, I wanted to make a woven pouf instead of just painting it.
Again, the straw hat came in handy. I wrapped the coffee table in cardboard, then wrapped that with the straw hat material and glued it all together.
I made the pillows and throw blankets from the girl’s clothing, added a “window” with magazine views, and made a Roman shade with fabric I had on hand.
For the tree, I took a real branch and glued faux leaves to it (because I am insane). The pot was actually a tequila bottle cap because #quarantine.
I made the end table by wood gluing two pieces of scrap wood together. I also made a lamp out of one of the tiny Barbie liquor bottles (you read that right. I’ll explain later haha) and an avante garde (lol) lampshade out of some white card stock.
For the tv console, I thought it would be a cute idea to make it look like the cabinet in our house. I made a little cabinet out of wood and L brackets that I attached around the tv stand base the set came with. Then I drew the geometric design on the “doors” with a brown marker.
And then, because I went completely mad and because I was peer pressured by people on Instagram, I made a tiny tapestry to cover the tv. It can come on and off to cover the tv screen. I cut out a photo of Guardians of the Galaxy for the screen because it is my girls’ favorite movie.
If you noticed the tiny Homegoods bag, and you haven’t called the authorities, I thank you. Ha! I was also peer pressured to make this I swear!!
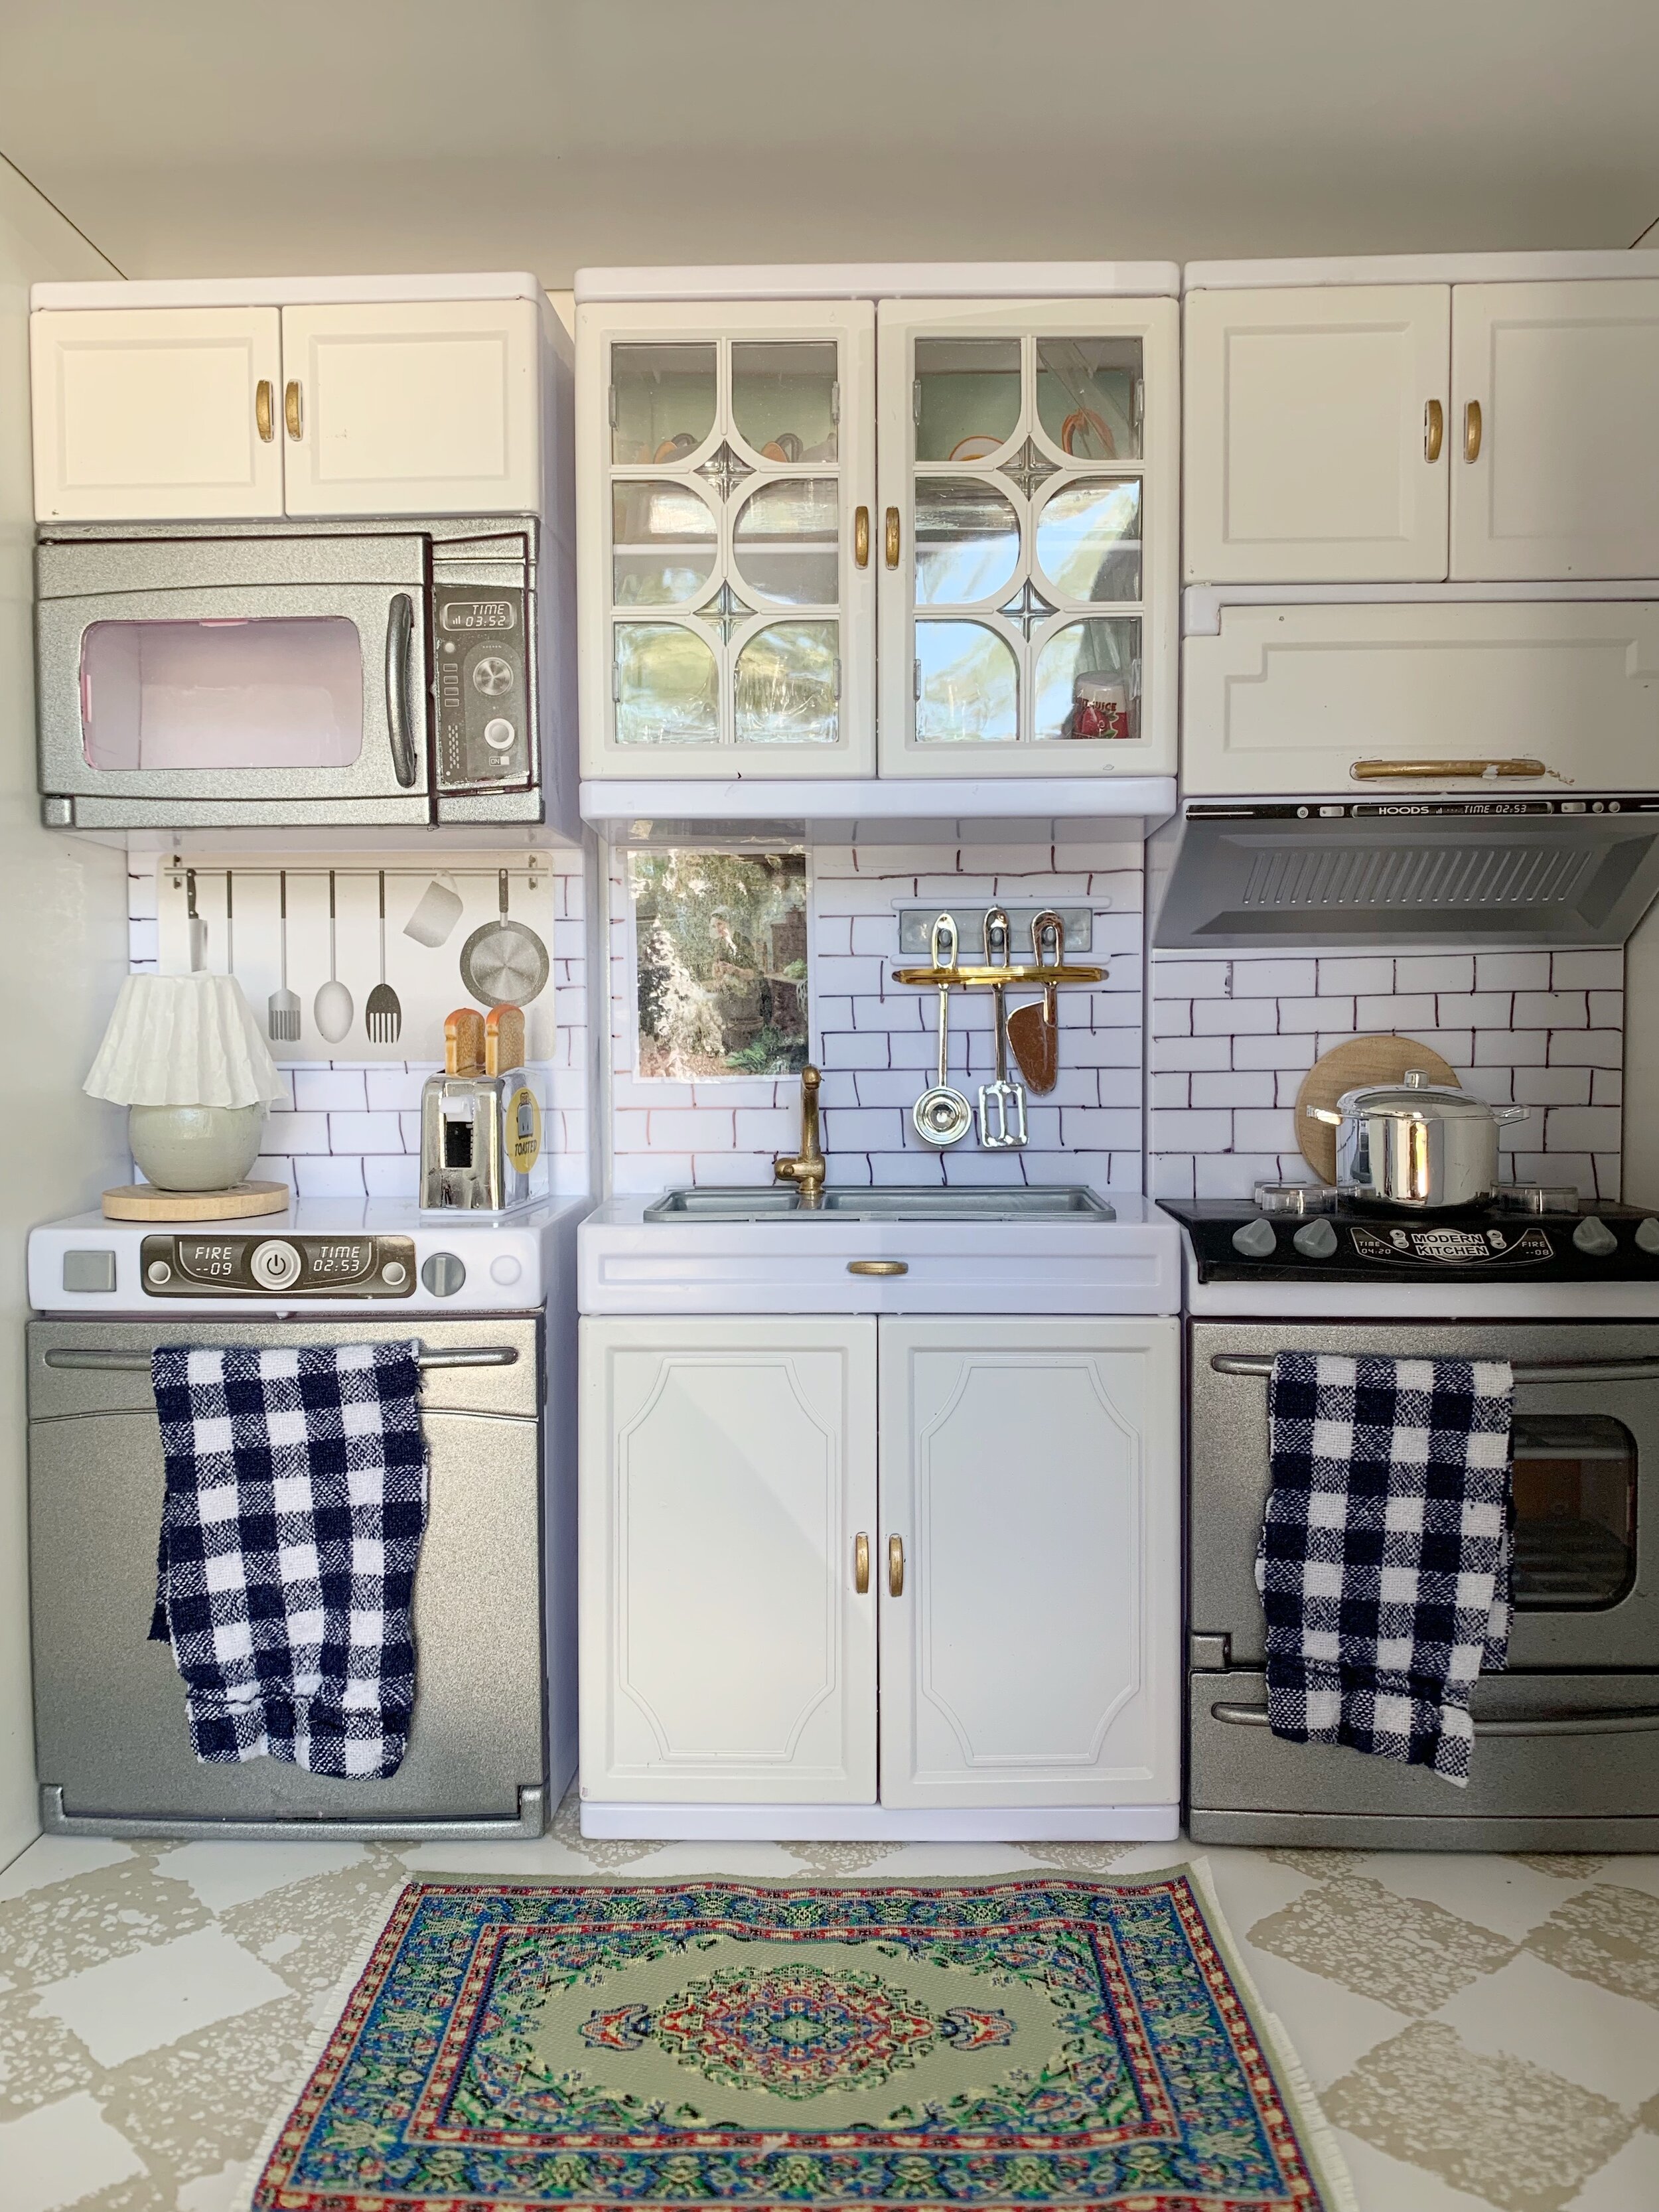
Let’s move on to the kitchen!
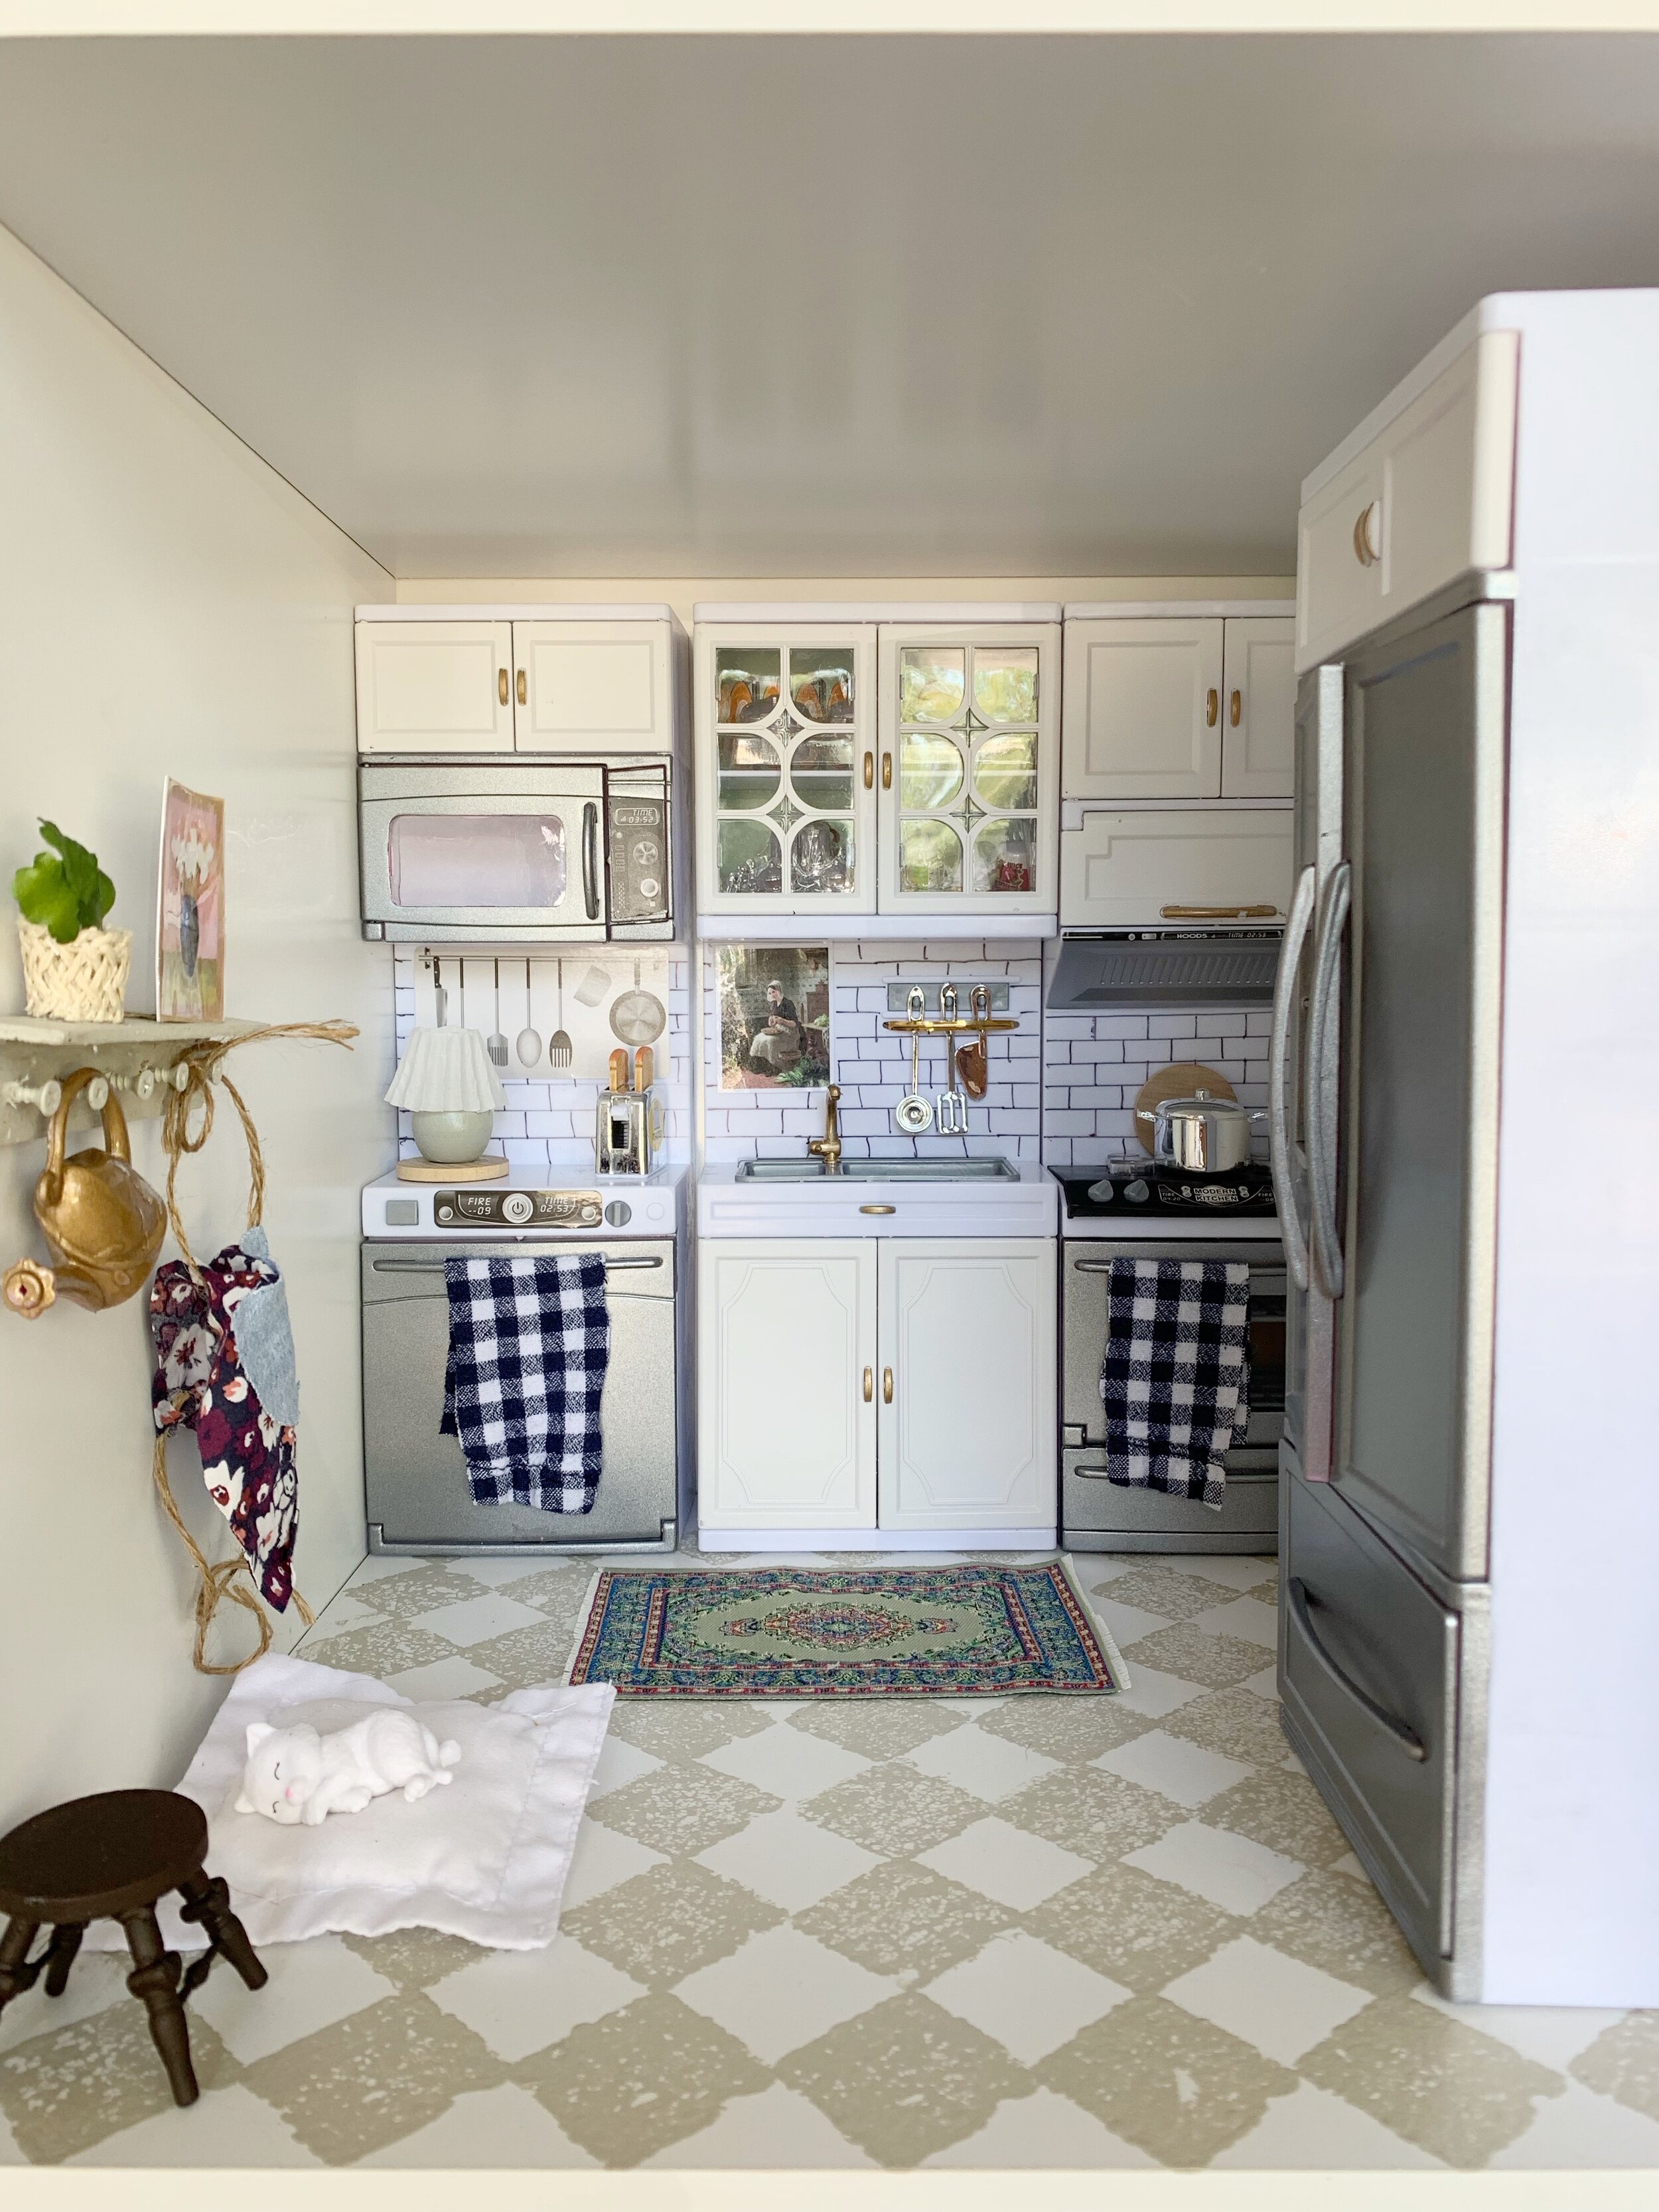
I started with this pink version and painted the appliances silver and the cabinets white. I painted the hardware and faucet gold for an added touch of cute. I also drew some subway tile onto the backsplash with a permanent marker pen.
For the floors, I sponge painted the tiles onto the floor and then covered it with clear contact paper to make sure it doesn’t chip.
The finishing details like the peg rail, art, stool, etc. were all so fun to make! Get creative and find trash to turn into these little treasures. You can also steal your children’s toys when they aren’t looking and spray paint them to cute them on up! I totally did that. hah!
On to the dining room.
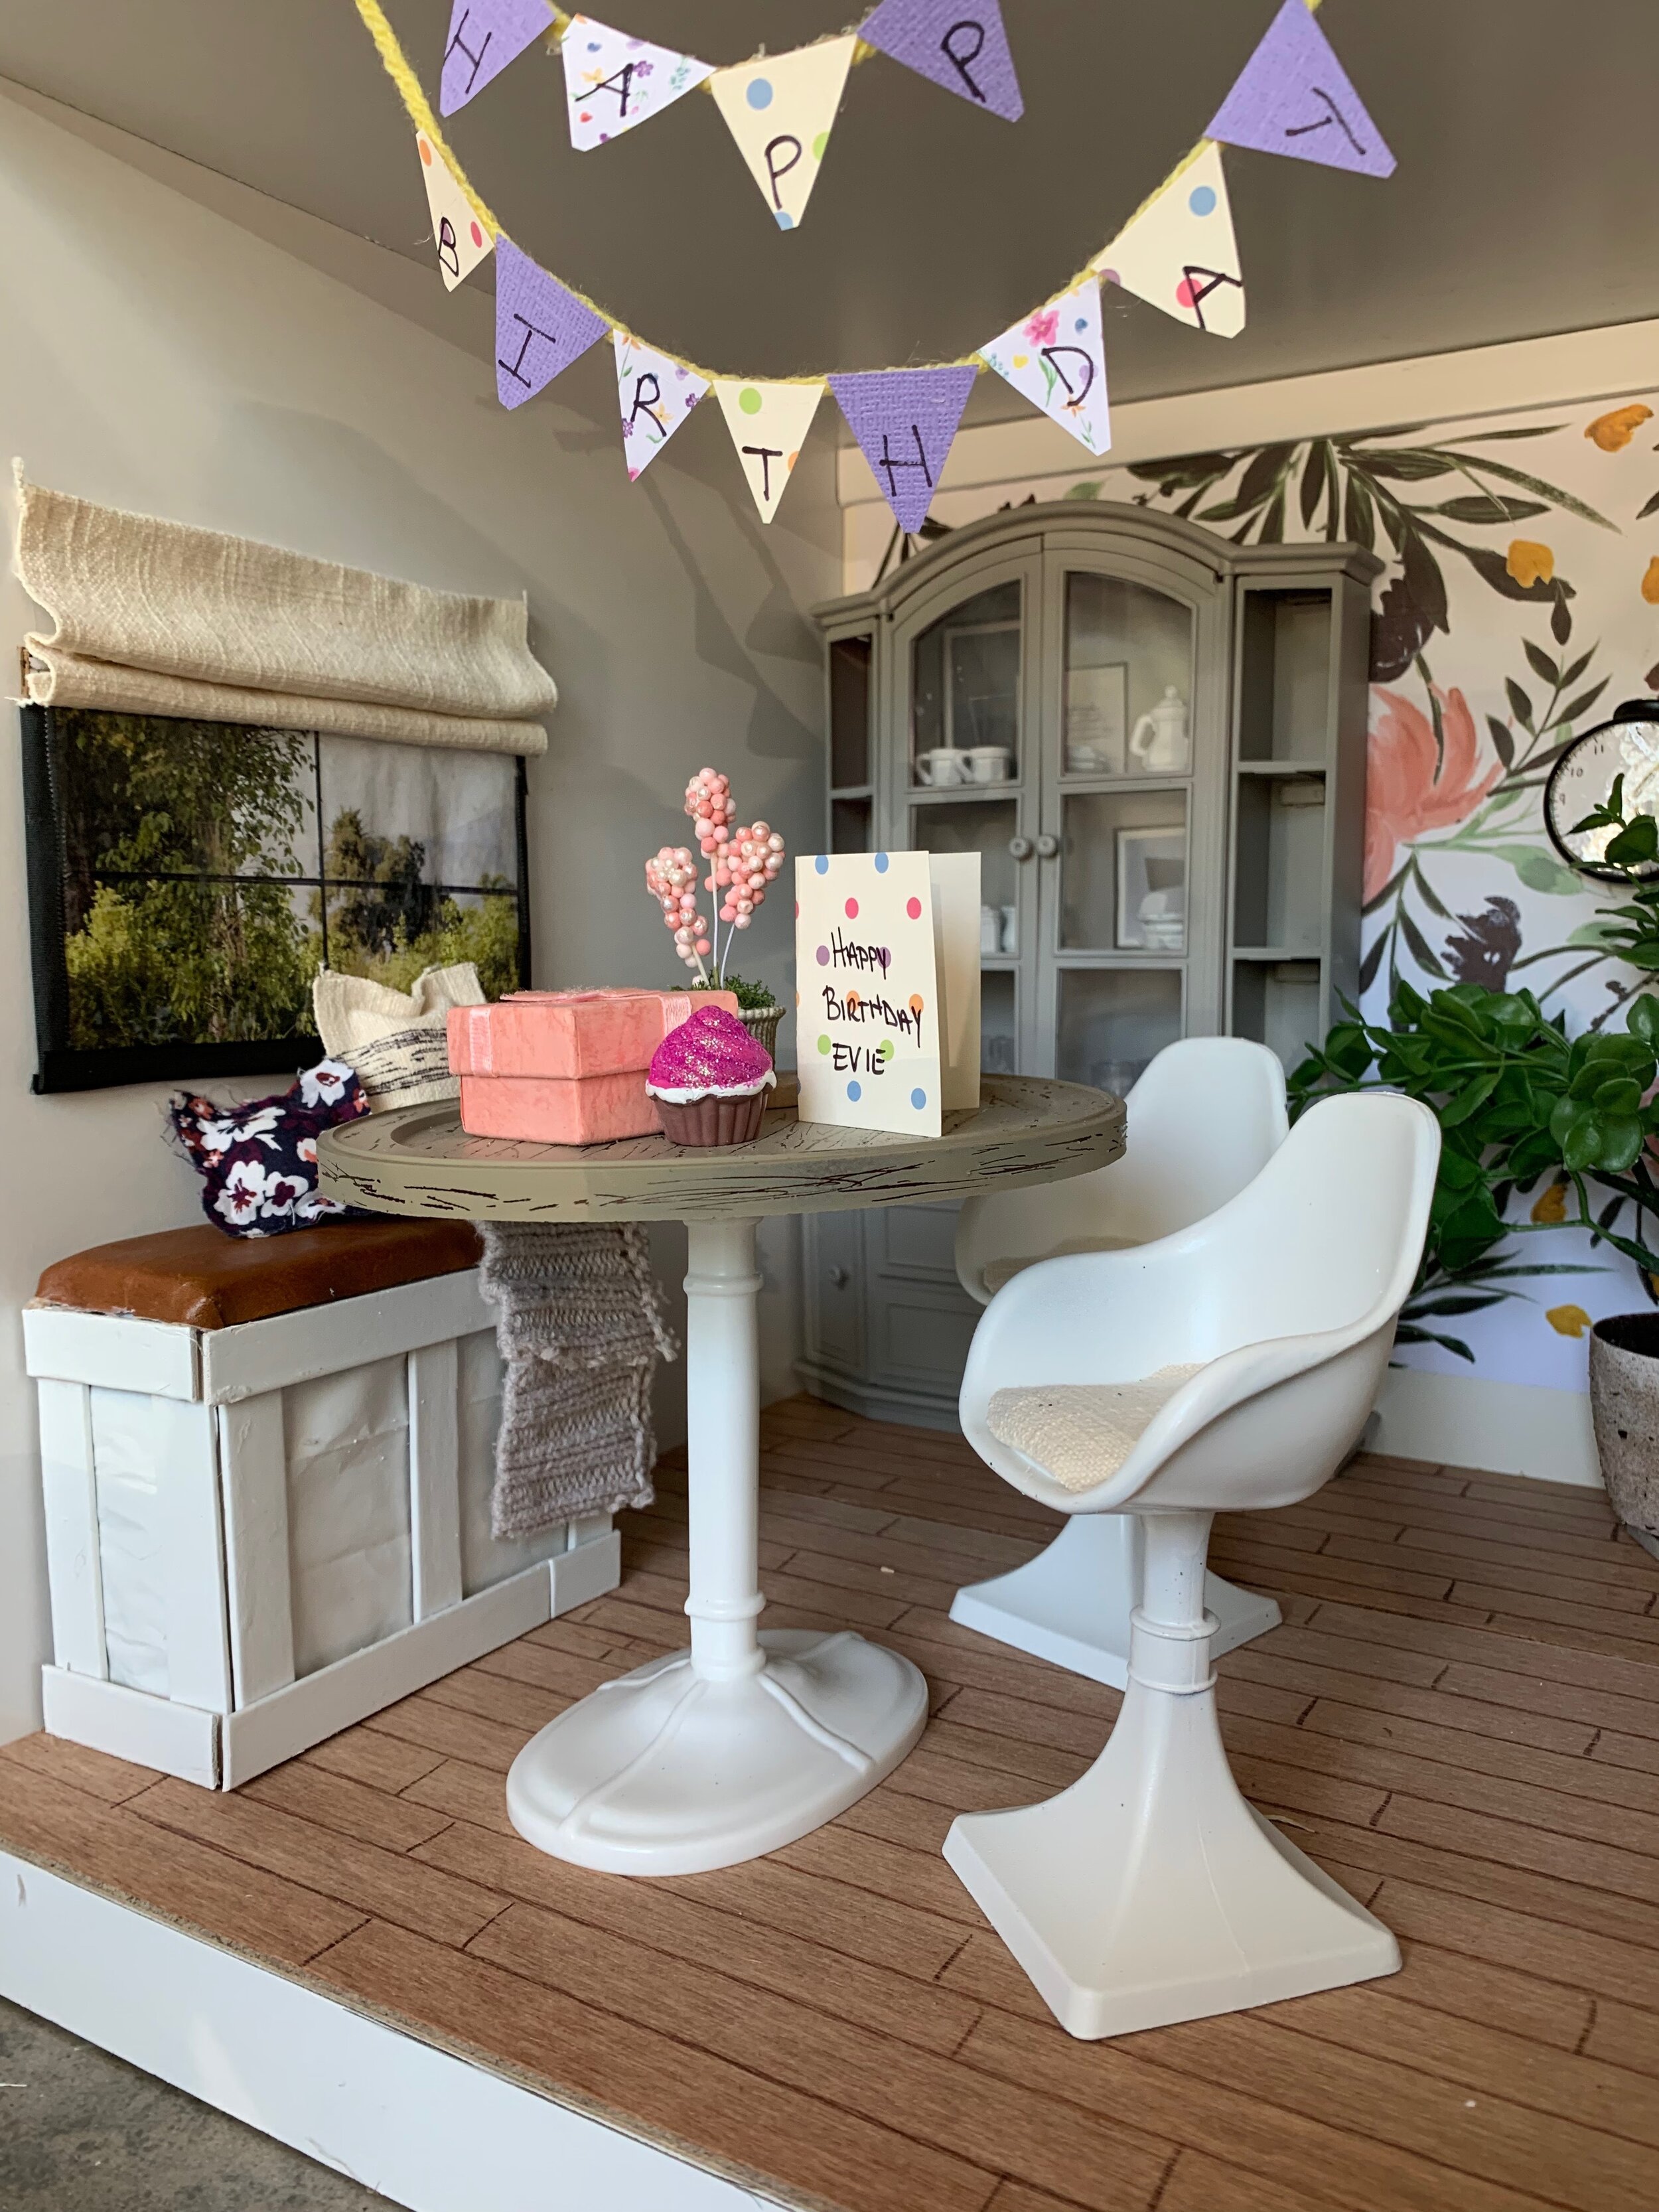
I decorated the room to look like a birthday party because this house was a gift for my daughter’s birthday! I think a lot of the things I did are self explanatory, but I wanted to share how I made the bench and also the fact that I glued the dishes and accessories into the hutch. Don’t judge me. Hah!
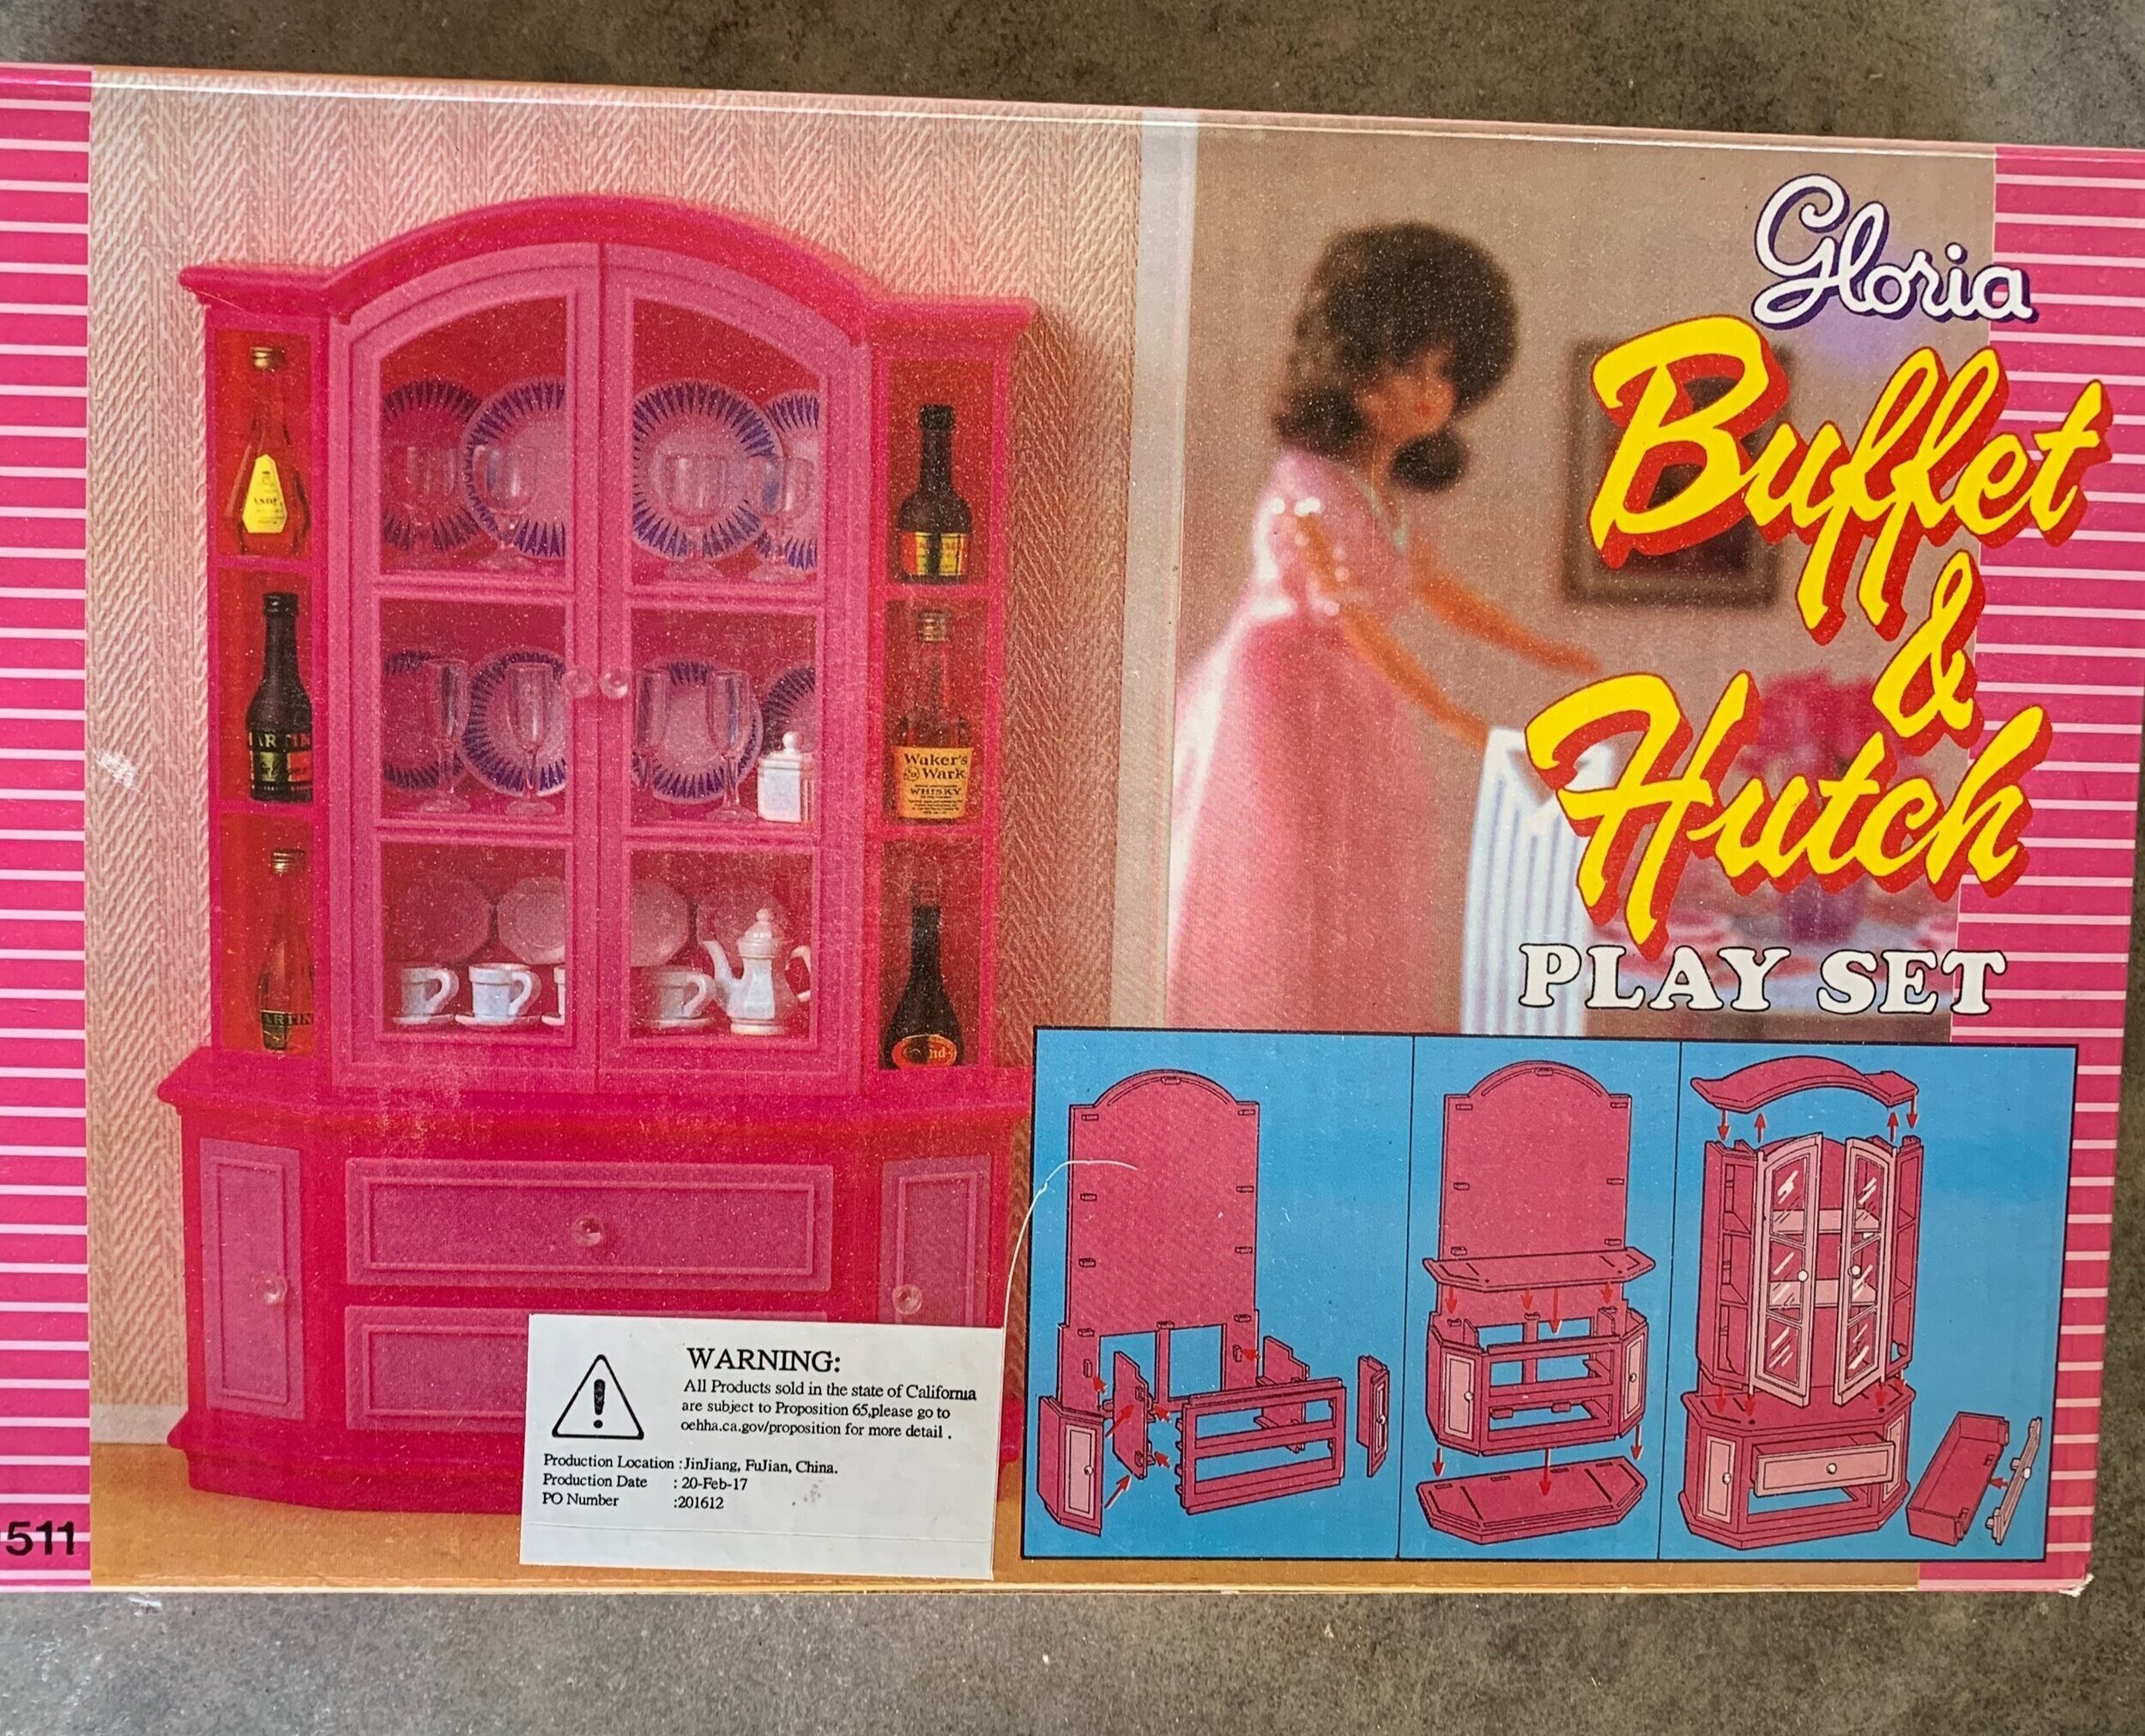
Speaking of the hutch, it came with tiny Barbie liquor bottles and I couldn’t stop laughing. We did not keep them for the girls to play with before you get upset. ;) This set were clearly not from this decade according to Gloria’s hair… but this hutch is pretty fabulous so… had to have it.
Gotta love the tiny bottle of Wakers Wark whiskey! HAHAHAHAH!
Ok, moving on…
To make a bench, I wrapped a cardboard box with brown paper. I added popsicle sticks to create the trim, and painted it all white. To make the top “cushion”, I used faux leather from our kitchen bench (I cut a scrap from underneath our bench. Again, no judging) and wrapped it around more cardboard to make the top.
For the hutch, I painted it, painted all of the dishes white, and then cut out some art from home decor catalogs to style it. And I stand behind my decision to glue it all into place. They have other dishes to play with. They don’t care as much as I do. KRAGLE for evaaaaaaaa! LOL (Lego movie ref)
I’m kind of moving right along at this point because I think you can figure most of this out once you see how I just kind of get creative and make tiny things appear from trash and scraps. You will start coming up with all kinds of awesome little ideas to make it special. I promise. It’s so fun.
Let’s take a peek at the bathroom/ laundry room.
This is one of my favorites! I painted the floor with greay paint I had and then used a Qtip to make white dots. It was supposed to look like penny tile but it ended up looking more like pebble flooring which I actually love. Then I topped it with the clear contact paper to protect it from scratches.
Like I said, use what you have, get creative and add those details! I made baskets from the straw hat, had a mirror on hand, made a globe pendant out of a plastic ball and some string, added art by printing out a piece from the Pottery Barn website, made some Turkish towels because of course I had to do that… oh and we cant forget the tub tray complete with tiny sponge. I glued that on too. Hahahah! You’re not surprised.
And that’s it! The dollhouse tour is through. If you have any questions I’d be happy to answer them. I also have the entire process filmed and saved to highlights on my instagram account.
Now go pour yourself a nice glass of Waker’s Wark, and lose your mind in the BEST possible way! And please share your dollhouses with me so I can see them! Have fun and thanks for stopping by!
